

Introduction
Hierarchical Reinforcement Learning (HRL) has been a trending concept among Reinforcement Learning practitioners recently. When correctly applied, it might help an agent explore the environment.
Generally speaking, with HRL we split the main problem into smaller sub-problems, which makes solving the original task much easier. But, having multiple sub-problems, we need to introduce multiple agents - one agent per sub-problem. This might sound like a huge overhead for some applications, but it might be worth it in other contexts. Let's illustrate that with an example.
We are tasked with solving an environment, where an agent is supposed to find a way out from a 2D maze constructed from a series of intersections and corridors. The environment allows for controlling of the agent with its kinematics (velocity vector). Each time the agent hits the wall, it receives a small negative reward, but for each distance unit it travels in the correct direction, it receives a small positive reward. Furthermore, the agent is rewarded for reaching the exit.
With a classical approach, we'd use a single agent, which needs to learn both strategy skills (which corridor to take at each intersection) and motion skills (how to pass through a corridor without hitting walls). For small problems, and with a sufficient amount of samples, this should work. But what happens when the complexity of the problem increases, or we start losing control of how the agent behaves in terms of strategy or motion skills? The natural choice would be to spend some time tuning a reward signal, but can we do better?
With HRL we can extract two agents: one responsible for selecting a corridor on an intersection, and another responsible for navigating through the selected corridor. Two agents mean two reward signals, two models, even two policies. This introduces a lot of flexibility. If we find one agent working poorly, we can change his behaviour by shaping only its reward. This won't directly affect the performance of the second agent. Furthermore, at any time we can decide to supersede the motion agent with a simple PID controller and simplify the problem.
We found this separation very useful in our experiments with Autonomous Web Testing Agent. As we haven't found any resources on how to design such environments from a software engineering perspective, we decided to briefly share how we went about it (and the results) in this post.
Planning
Let's start with how we'd like to interact with the original environment. One option is to use a standard gym.Wrapper interface, but this forces us to use already encoded observations. This might be fine for small environments, but becomes problematic for larger ones (including ours). Another option is to extend the original environment with our interface. With this approach we have full access to the internal state of the environment, so we can operate on internal objects, which are usually much easier to understand. The downside of this approach, however, we had to rewrite some of our existing code. We chose the second option.
Next, we focused on practical Reinforcement Learning, where we constantly redefine our environment as we are running more and more experiments. Therefore we'd like to have multiple HRL versions of the same underlying environment to test which configuration works better.
Furthermore, we utilize Ray and RLlib to run our experiments, which required adapting to their environment interfaces. Luckily, RLlib comes with MultiAgentEnv interface, which makes developing multi-agent (and HRL) environments easy. We just need to make sure our observations, actions, rewards, "dones" and infos are all dictionaries. Keys of the dictionaries must be agent IDs, unique for each agent's episode in the environment. This is especially important for HRL, where during one episode of the environment, there might be multiple episodes of the same agent (see the picture below).
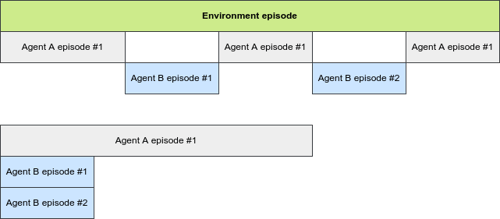
For this case, we need to ensure unique IDs for Agent B during two episodes.
Finally, we'd like everything to be statically typed as much as possible. We found this extremely useful when catching obvious errors and making the code easier to extend and maintain.
Implementation
Our complete implementation can be found here. Below, we briefly describe the most interesting parts.
Agents
To define a custom agent we simply inherit from our Agent class:
This class is parametrised with the following types:
EnvConfig- the type representing the configuration of the environment (i.e. the common configuration, as each Agent has access to this configuration).EnvState- the type of the internal state used by the environment. This might contain a lot more information thanAgentState.AgentConfig- the type parametrising configuration of the Agent.AgentState- the type representing the internal state of the Agent. This is usually a narrowed version ofEnvState.AgentObs- the type of the observation returned by the Agent (e.g. a dict ofnumpyarrays).AgentRawAction- the type of the action returned by the model (e.g. a simple int or a vector).AgentAction- the type used to represent the agent's action on a higher level.
With these types in mind, let's move to the fun part - the methods.
The first two below are pretty straightforward. They define observation and action spaces, respectively. They have access to both agent's and environment's configs, so as long as the configs are well-defined, it should be simple to define the spaces.
Next, we have a method to translate the internal state of the environment into the internal state of the agent.
Inside encode_observation we transform a high-level representation of the Agent's state into its lower level, numerical representation. In other words, this is the place to encode all the fields we defined in the observation space. All the values must be properly scaled, as otherwise an error would be raised (i.e. the observation space must contain the returned observation). This representation is later returned from the reset and step methods in the environment and used as an input to a model.
When the policy produces an action, we transform its raw version into a meaningful structure. It's easier to operate on Move(Direction.LEFT, speed=5.0) action, then on a [3, 0.5] vector.
    @abstractmethod
    def decode_action(
        self, state: AgentState, action: AgentRawAction
    ) -> AgentAction:
        """
        Transforms a raw action (i.e. model's output) into a well-defined action,
        either directly related to the environment or to some other abstraction
        (e.g. agent switching).
        """
        pass
In order to determine whether the agent has done this or not, we use has_done method. Based on a given state, it returns True if the state is a terminal one, and False otherwise.
The reward calculation is based inside calculate_reward method. Note that with these arguments we can calculate R(s'|s, a).
Finally, we have four callbacks to support various use cases, e.g. tracking the number of steps the agent has performed, or passing the goal information from the withdrawing agent to the agent taking control.
def on_takes_control(self, state: AgentState, action: Optional[SwitchAgent] ) -> None: """ Called when the agent takes control. The `state` represents the current agent state and the `action` represents the cause of the agent change, in case another agent initiated the change. This might be used to set a goal for the agent. """ passdef on_step(self, action: AgentAction) -> None: """ Called on each step of the agent (before the action is decoded and the observation is encoded). """ passdef on_gives_control(self, action: Optional[SwitchAgent]) -> None: """ Called when the agent gives back control (e.g. when it's done or generated an agent switch action). """ pass
Environment
The HierarchicalEnv plays the role of agents' supervisor. It tracks the current state of the environment and reacts when some pre-defined situations happen.
First, let's define which agents build our environment in agents method:
Then, we need to mark which agent is the initial one (the one which starts each episode).
The next step is to define rules of our simple state machine. We start by defining which agent should be selected, when the current agent finishes. If the whole episode should finish, we simply set it to None.
Then, we define a list of triggers, which are lazily evaluated one by one, until the first match is found. If there is no match, an exception is raised.
But, what are the triggers? They are simple predicates on the current agent and its action. If the predicate holds, we select the agent associated with the trigger as the next agent.
Here are some examples:
lambda name, action: name == STRATEGY_PLANNER and isinstance(action, MoveTo)lambda name, action: action == RESET_ACTION
Now, when the state machine is finally defined, we can define what our initial environment state looks like.
The last piece of code is the env_step method. We decided to put it here, instead of defining it separately for each agent, but both solutions are fine. This method is responsible for affecting the environment state with the action selected by the agent. What does it mean? Well, it depends on your environment. Sometimes this might be a call to a simulation tool or a real object, but sometimes it can be just a simple variable assignment.
That's all you need to implement in order to use our proposed interface. The rest of the magic happens in reset, step and a bunch of helper methods. Feel free to deep dive into them and if you have any suggestions how can we do better, please let us know!
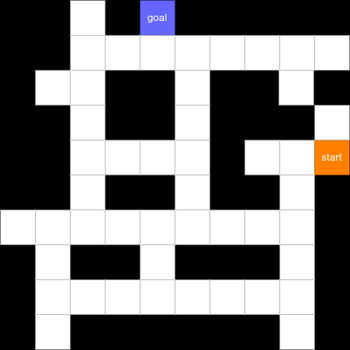
Maze example
With the interface defined above, we approached the maze problem defined in the introduction. As this is just an example, we significantly simplified the environment. The maze was discretised into a grid of tiles. The strategy agent still selects the corridor to take, but the motion agent can only decide whether to move forward or backward, for a distance of a single tile.
With these simplifications, the environment could be probably solved with a classical, single-agent approach. However, discussing advantages of hierarchical approach was never the point of this article. Instead, we wanted to present our findings on the software engineering perspective of this problem.
You can find the example application here.
Conclusion
Practical Reinforcement Learning is hard. The small number of implementation resources from the software engineering perspective in this domain makes it even harder, especially for newcomers. With this blog post, we hope to make it at least a bit easier for those interested in designing their own hierarchical environments.
By introducing our interfaces, we greatly enhanced the flexibility of designing our own HRL environments. Tasks like replacing agents, tuning them and testing their behaviours are now much simpler to do. What's more, if we find out that one agent can be replaced with a model-based (non-RL) agent, we can use the same abstraction to do that. The whole environment will work the same as previously, but with one fewer trainable agent.
Our next plan is to test the approach on more environments and iteratively update our interfaces, as we find out more problematic use cases. Stay tuned to our repository for more updates.